Showing posts with label DIY. Show all posts

16.6.15

Focus

Did three reps of squats at 65 kgs yesterday, yay me. That was my first workout for six days... six!! Oh dear. At least my cold is gone...

Went for some errands today and the weather was sooo nice. 21 degrees, some sun, a little bit of rain and nice cool wind. Almost felt like Sweden ;D hopefully I'll be finished with exams within three weeks and be on my way home. I miss the countryside so, so much.

Wore my DIY-shorts made out of old jeans, these are my favourite but almost falling apart by now huhu.

27.7.14

DIY body chain

YES! Free time = DIY time.


Body chains are quite pricy and it's hard to find the perfect fit, why I decided to design and construct my own. How to below!

What you need to make the same chain as me:
- 2 - 3 meters of gold chain. I ordered mine from UK through Ebay.
- Jumprings to connect the chain pieces
- 2 lobster clasps or corresponding
- a pair of small pliers of some sort
- something to cut the chain with
- optional, rough thread to construct a prototype

1. Optional. Construct a prototype using the thread to make the chain customised to your body. I used crochet thread. Tie threads in front of a mirror to achieve the look you like.

2. Take your prototype off. Trace thread along the prototype to create the pieces that you will use as template for the chain.

To make my body chain this is what I used. I'm 172 cm (5'8'') tall and wear european size 34/36 XS/S.
- two pieces (right and left) that will go around the neck (30 cm each)
- one front-piece (6 cm)
- one back-piece (30 cm)
- two short waist-pieces (41 cm) these are the top two on the prototype
- two long waist-pieces (51 cm) the lower two

3. Measure the gold chain against the template strands and cut the gold chain accordingly.

4. Connect the chain using jumprings! Use the pliers to open and close the jumprings. There will be one jumpring at every place that strands of chain meet. I used 4 rings, plus 4 more for the lobster clasps.
Taking the prototype off, I noticed that the "short waist-pieces" passed very tightly over my shoulders so this is where I decided to use the lobsters to prevent the chain from breaking when I take it on/off. I placed the clasps at the end of the short waist-pieces to be connected in the back.

5. Finito! Wear it :D

3.6.13

DIY: fringed + studded shorts

Heyy again. I finished making these shorts several weeks ago and then I waited to get some nice weather to take the photos outdoors... However the nice weather never came, why the quality of the photos is not too good out in the cloudy weather. Weelll....

I decided to distress these shorts since I never wore them because of a weird (coffee?) stain on the side. Just like with the scallop top (link), haha. Don't ask me where I get these stains, I don't have a clue, but I hate stains and I can't stand wearing clothes that have a stain.

The big difference with distressing these shorts compared to jeans shorts was that the fabric here was partly elastic. This is to keep in mind if you want to do a similar project where the fabric is not stiff denim material. When you distress denim you can sort of just make some cuts and throw the object into the washing machine, it will come out thready and awesome. But when working with elastic fabric the shorts will look almost the same as when you threw them in. So think about doing every detail to the extent that you would wear it as it is - thus you have to do the washing machines' job, too.

Nevertheless... I'd like to say that I'm fully satisfied with the result but I actually feel like removing the studs in the front. But I'm scared that there will be permanent marks there now, haha. Should I add more or what do you think...

29.4.13

DIY distressed jeans

Hey look what I did with my old jeans! If you have a pair of old pants which you seriously never use for some reason, go ahead and cut them and make use out of them! It's soooo much fun and everyone will want to have your unique pair of jeans. Hehe.

1. Before. I didn't wear these jeans for a long time because I tore one of the strap thingies used for holding a belt (you know?) so basically there was a hole in the jeans, which I hated.

2. Freshly cut. See how the fabric actually looks like it has just been cut? Now you just need to throw the jeans into a washing machine for a standard program wash to get that nice fringy look to the edges.

3. TA-DA. You can all have your own opinions but I personally LOVE the look. Now that the jeans are distressed I don't mind the hole and I'm toootally wearing them again. You should not worry that the washing machine will mess up your cuts, they will be exactly the same but fringy and maybe 15% bigger due to the loss of loose/excess threads.


7.4.13

DIY jeans shorts

Now that I've finally had a few days to relax and do random things I decided to give a pair of old jeans a makeover :D


AND since I was so excited to cut my jeans once I got the idea, I forgot to take a before-picture. I had to go into my old blog to find a pic of the jeans, and here they are (/were?)... photo from April 2009. LOL.

12.3.13

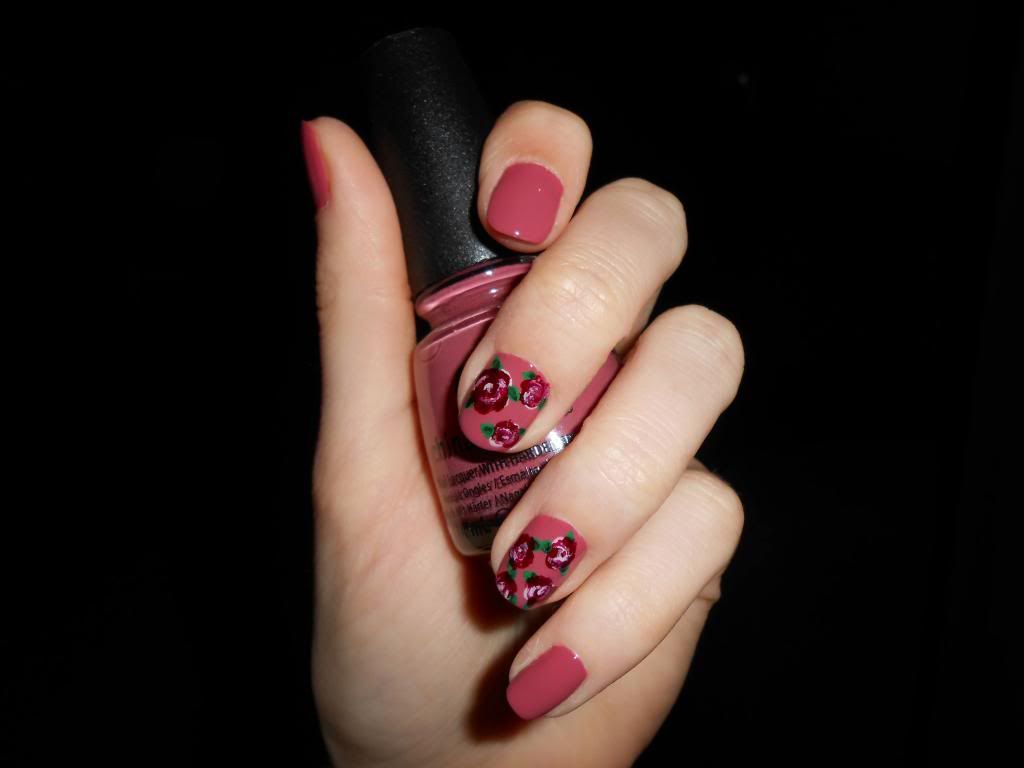
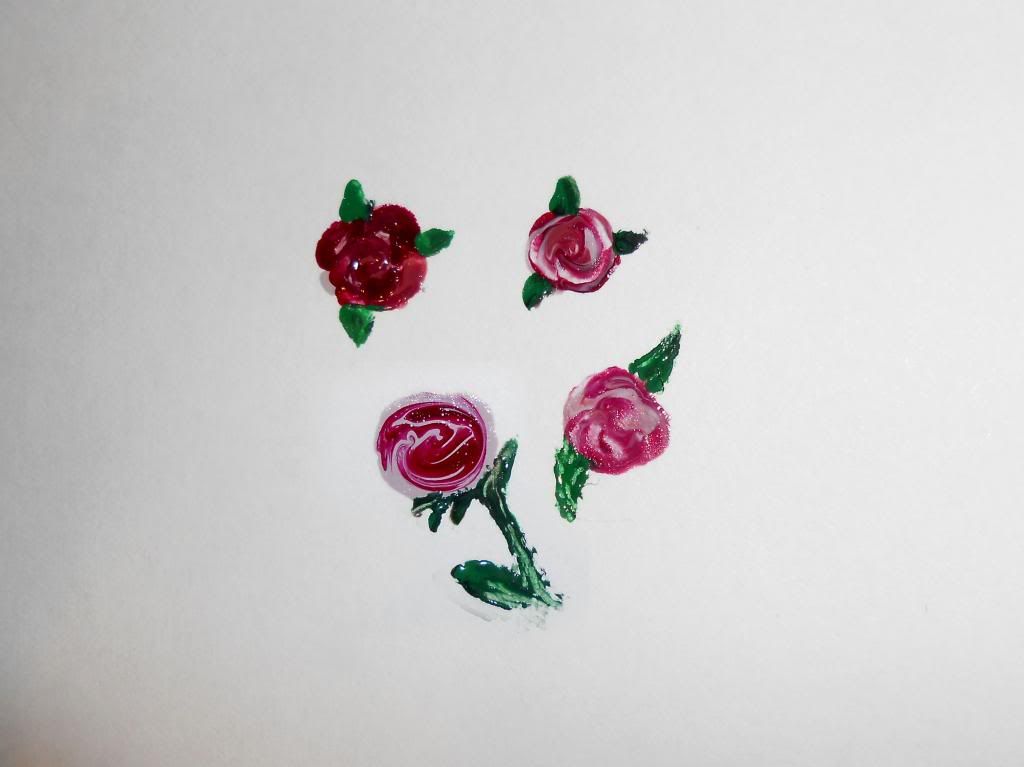
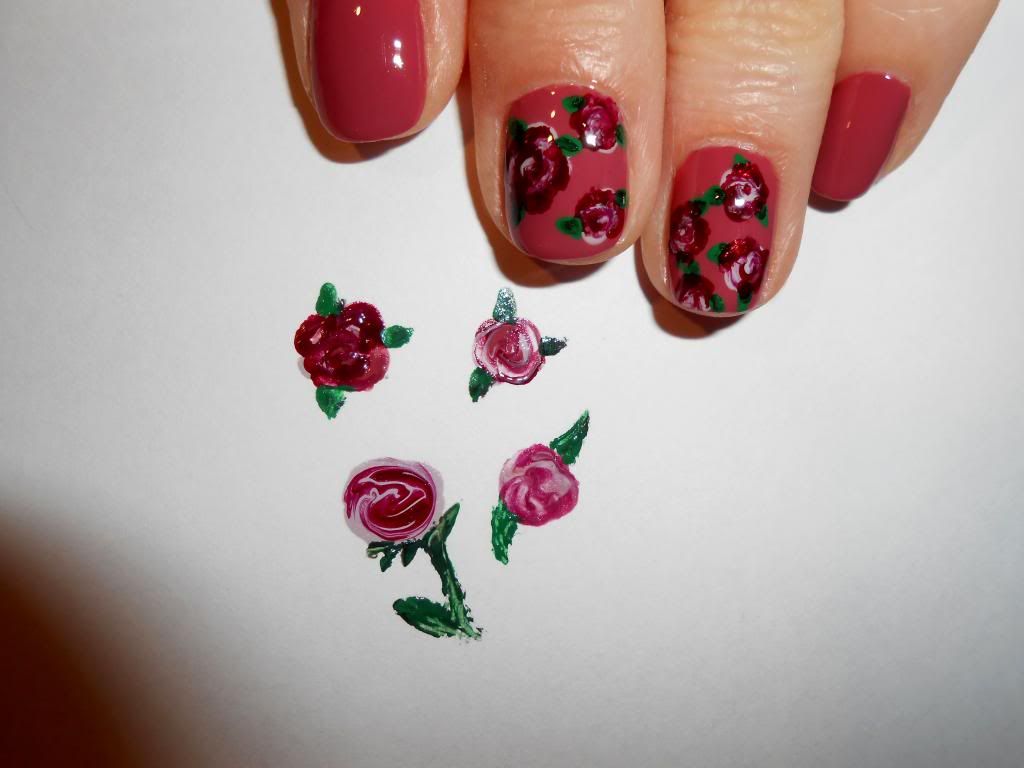
Roses @-->-- nail design


DIY, how to:

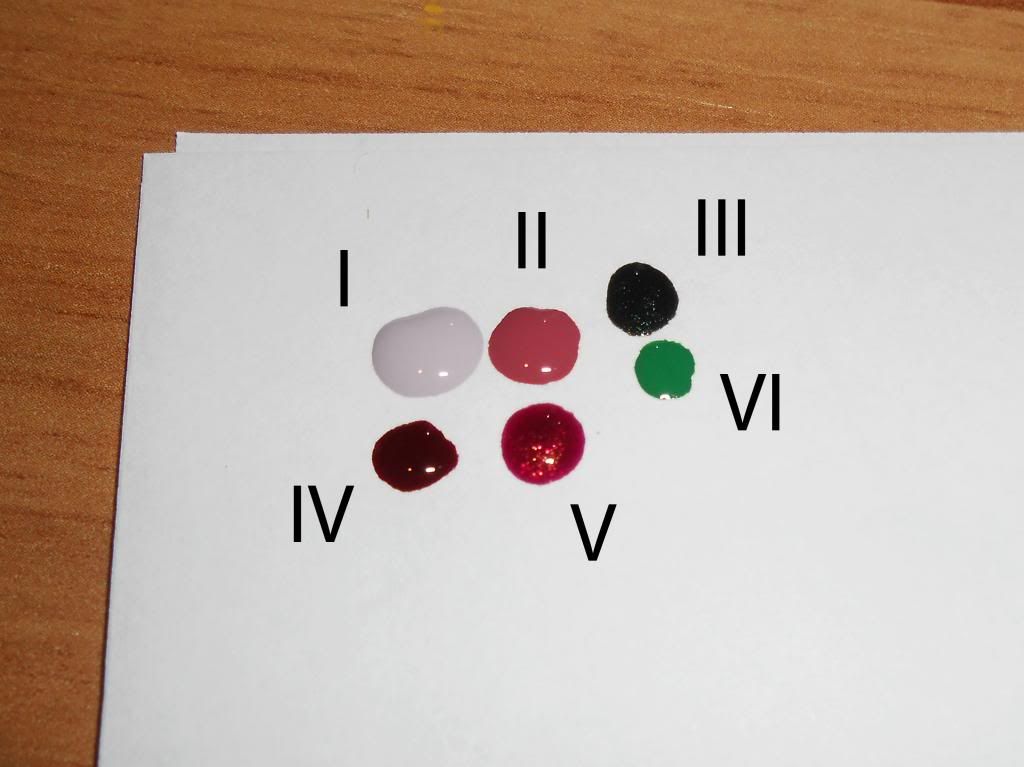
1. Assemble your colours! I think it's easier to paint if you pour out a little of them as I did in the picture.

I - China glaze Light as air. II - CG. Fifth avenue. III - Maybelline 761. IV - Maybelline Rouge couture. V - BeYu 209. VI - Konad.


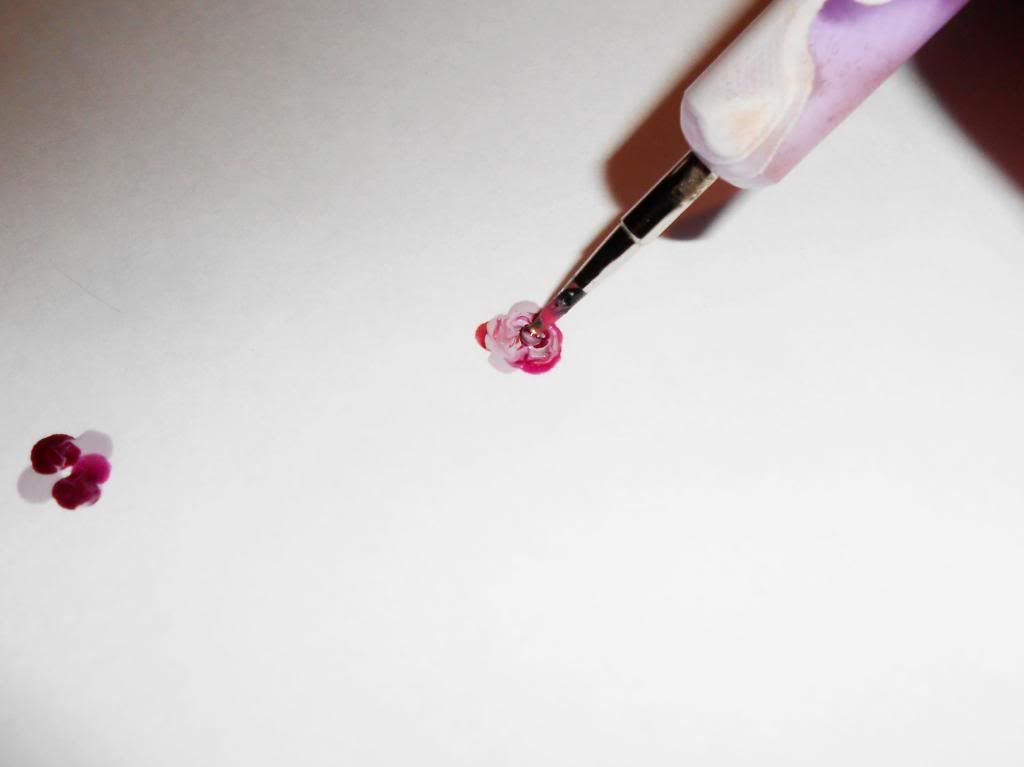
2. Add the colours of the roses in droplets on top of another as seen to the left, then use some sort of tool to swirl the colours together from the centre and out in a tornado motion. A toothpick is a suiting tool.


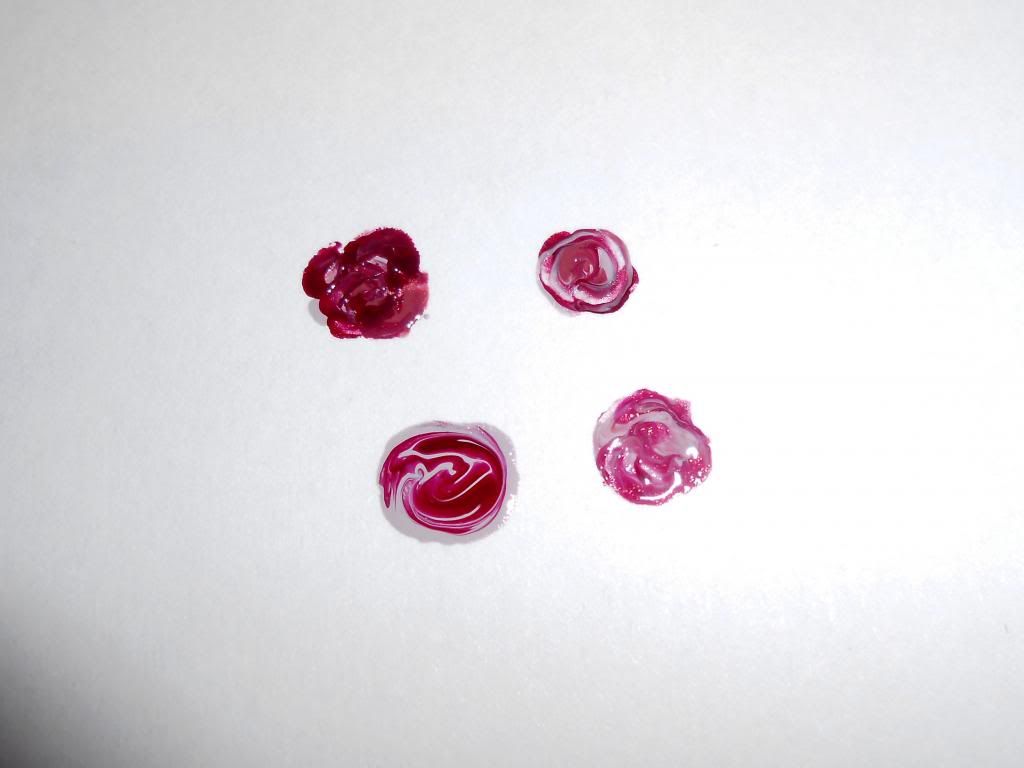
3. You can use more or less of certain colours and swirl randomly, the roses will appear unique every time. If you want you can add more of a certain colour at specific spots as I have done to the flower on the top left.


4. Leaves! Use the light green colour to make the base and fill in a little with the darker green thereafter. Depending on the length of your nails you might prefer different versions, here are a few examples.


5. Add a topcoat to make the roses float together with the background and to make the design last longer without chipping. Finished :)))

1.3.13

Tip: a cheer up

Put a nice picture of your boyfriend/girlfriend as a screensaver on your phone. Preferably half naked. Be thou single so put some other half naked person whom you likest. This will cheer you up every time you press your phone even when you are only checking the clock. I was annoyingly, stupidly tired in school today... but  every now and then I could very easily press to see that picture. Mhmm. In retrospect: it was a good initiative.

5.11.12

How to: scallop top! DIY

Sad and excited about this! My favourite gym t-shirt in neon orange... I had the chance to wear it only twice before some crazy black stain of unknown origin attacked it. I tried the everythiiin in my power to get it off but in the end the stain remained and a significant amount of colour was lost around it. If this ever happens to one of your favourite t-shirts, do not throw it out! Chop it! Or if you have a top that you never wear, or if you just feel like creating something super cute then chop!!

You can make this:


From this!


You need:

The top, the first thing you must do is to immediately turn it inside out! Rulers. A fabric pen or something like that, I don't have one so I used a cheap white eyeliner from H&M. You also need a couple of fine scissors but I forgot to include these in the photo heheh.


Step 1:
Decide how short you want your top to be, at this level you will draw a line across the top. To make the line perfect (you want to do this!) - measure the distance from the bottom of the top and plot dots at this level across the top, then intersect the dots.


Step 2:
Figure out how many scallop "steps" you want in the front and back. My conclusion was 14 (2x7). Measure the distance across the top at the line that you created. Divide this distance by the number of scallops you prefer, this value is the lenght of one scallop - where it starts/ends. Eg. my t-shirt was 45,5 cm across, I wanted 7 scallops so I made a mark at every 6,5 cm (45,5/7).

Be precise with the marking! You need to be able to fully trust your marks once you start to cut the fabric or you will be tempted to adjust the cutting while you are cutting and the result will likely turn out asymmetrical and not nice!!


Step 3:
We want demilunes or half circles to make the scallop, right, so from every mark that you made you will now create a half circle. If you find a round object which is in good size with your scallops you should use this as a guide to create uniform scallops. It will turn out sooo nice! I used a candle.


Step 4:
Cut! I recommend fine scissors to get a nice edge. I used manicure scissors. Cut slowly; depending on the fabric of your top it might be hard to make a perfect cut, we don't want mistakes and extra job. I have a lot of lines on my t-shirt because I changed my mind a bit half way through heheh.


Aaand you're DONE! So cute! I wanted a scallop top for so long now . If you want to you can also scallop the sleeves or make a t-shirt into a tank top, I decided not to for now because I want to keep the length of the sleeves =) Enjoy your unique cute tops!!

28.10.12

DIY home spa hair mask!

1. The organic formula that will make your hair soft and shiny!

I use honey, virgin olive oil and pomegranate juice. Honey and olive oil are the important ingredients here! The pomegranate juice contains more Vitamin C (an antioxidant) than any other fruit; I add it to condition my scalp. I add honey and oil in about a 1:1 ratio, then I squeeze a few grams of pomegranade with a garlic press right in to the mixture. Adjusting the proportions is fine it will still be a great mask for your hair =)

If you have platina/strongly bleached hair I suggest to skip the pomegranate as is is very pigmented and maybe could stain your chemically treated hair!?

Note that honey contains traces of peroxide and will slightly bleach your hair after sequential use of this formula since peroxide lyses melanine - the pigment in your hair.


2: Hair with no products or chemicals in it! I put the formula in unwashed second day hair.


3. Materials: formula, a spray thingy, comb, plastic bag, two elastic bands and maybe a few bobby pins.


First thing to do - you want damp hair! It will facilitate the application and increase efficiency of the formula. So spray your entire hair lightly with water. I use boiled (cool) water from the kettle because I don't want to stick excess calcium and chloride (etcetc) to my hair...


Comb your hair to avoid tangling! Then start adding the formula. I use my hand but I think a hair dye brush would be more convenient. Start by rubbing the formula all over your scalp and then work towards your ends. Your hair should be soaked! If you have long hair like me you may start to run out of formula before all ends are covered - if this happens I simply add more olive oil.


Wrap your sticky hair into a bun and tie it with the first elastic band. Spray some more water to the hair as it will already have started to dry, we want to keep it moist to increase the diffusion rate of the formula. Also spray a little water in your plastic bag.

Put the plastic bag on your head, empty the air. The excess plastic I like to twist and wrap around my bun. Use the second elastic band to secure the plastic on your head. If needed also use bobby pins to prevent the plastic from migrating.


Wear for at least 45 minutes if you want a nourishing effect! There's no point in wearing a hair mask for a shorter time as there will be no time for proper diffusion of the ingredients. If you desire to use this formula to bleach your hair you want to keep the formula in for several hours. I usually keep it in for five hours. The darker hair you have the more sessions will be required for you to see the diffrerence. My boyfriend noticed that my hair was lighter after a month (5 sessions) =)

The bleaching by honey is irreversible, as is bleaching by any method, because you are basically deleting the pigmentation of your hair. The outgrowing hair will have your natural colour. You can let the natural peroxide bleach your hair with absolutely minimum damage at the same time as you deep condition your hair. Love iiit.

Rinse the formula out using hot water. If you don't use hot water it will be difficult to remove all the oil and sugar. I don't recommend using your regular schampoo like you usually do, it will decrease the effect of the formula and add stress to your scalp. Use only a little bit of shampoo and then a much bigger amount of your hair conditioner (balsam). The ingredients of a conditioner is enough to dissolve excess sugar and oil. But it takes a longer time, rub thoroughly and probably twice.

This formula is also good to treat a dry scalp. If you have a dry scalp I really recommend to include the pomegranate or the juice of another antioxidant rich fruit, the ascorbic acid in the fruit is good against different fungi which are sometimes the cause of a dry scalp! If you have very oily hair I suggest to increase the ratio of honey : oil, but it is actually a good idea to treat an oily scalp with a little oil =)